
There is something genuinely satisfying about cutting into a soft, golden cake and finding little surprises hidden inside: pockets of melty chocolate, bursts of jam, or sweet fruit pieces scattered throughout every single slice. That is exactly what dot cake is. A classic, easy homemade cake with a simple batter and a fun twist where the dots can be chocolate chips, jam dollops, fresh fruit, or sprinkles-whatever makes the occasion right.
The problem most home bakers run into? The dots sink to the bottom before the cake has finished baking, leaving a plain crumb on top and a dense layer of add-ins at the base. That is why the Perfect Dot Method exists: a simple three-step technique that keeps every dot suspended exactly where you placed it. This guide covers the complete dot cake recipe, the science behind why dots sink, and how to get bakery-quality results in your own kitchen.
If you love simple, nostalgic desserts, our sourdough cinnamon bread is another classic worth adding to your weekend baking rotation.
Table of Contents
What Is Dot Cake?
Dot cake is a soft, tender homemade cake characterized by small dots of flavor distributed throughout the crumb. These dots are whatever you choose to put in them, and that flexibility is a large part of what makes the recipe so enduring.
The most common dot choices are semi-sweet chocolate chips for the classic version, jam or preserves dolloped into the batter for a fruit-filled result, fresh or frozen berries tossed in flour, dried fruit like raisins or chopped dates, chopped nuts such as walnuts or pecans, and rainbow sprinkles for a funfetti-style version that works well for children’s parties and lunchboxes.
What makes Dot Cake special beyond its versatility is its simplicity. The ingredient list is built entirely from pantry staples. The method is either one bowl or two bowls depending on your preference. The crumb is soft and moist with a tender texture that holds together cleanly when sliced. And the dots make every bite different from the last one, which is the kind of eating experience that makes people come back for a second slice without thinking too hard about it.
What a dot cake is not: a layered celebration cake, a technically demanding pastry, or a trendy viral recipe. It is a timeless comfort bake with roots in home kitchens, not restaurants.
This pairs beautifully with our cottage cheese banana bread as part of an afternoon baking spread.
The Perfect Dot Method: Why Dots Sink and How to Stop It
The biggest complaint about dot cake is not the flavor or the crumb. It is that the dots end up at the bottom of the pan by the time the cake comes out of the oven. Understanding why this happens makes the fix obvious.
Why dots sink in cake batter:
Heavy add-ins like chocolate chips, fruit pieces, and nuts are denser than the surrounding batter. When the batter is thin or pourable, gravity pulls the dots downward before the structure of the cake sets in the oven. Larger dots sink faster than smaller ones. And uncoated dots, especially ones with smooth surfaces like chocolate chips, have nothing to grip onto as they pass through the liquid batter.
According to baking experts at King Arthur Baking, coating add-ins in flour before folding them into batter is the most reliable technique to prevent sinking in cakes.
The three-step Perfect Dot Method:
Step 1: Coat the dots. Place your chosen add-ins in a small bowl and toss them with 1 tablespoon of all-purpose flour until lightly coated on all surfaces. This creates the grip that holds dots in place.
Step 2: Use a slightly thicker batter. The batter for dot cake should be scoopable with a spoon, not freely pourable. If your batter looks very thin, add an extra tablespoon of flour and stir to combine before adding the dots.
Step 3: Fold, do not stir. Add the coated dots to the finished batter and use a spatula to fold them in gently. Stop the moment they are evenly distributed. Overmixing at this stage deflates the batter, develops gluten, and causes the dots to break apart.
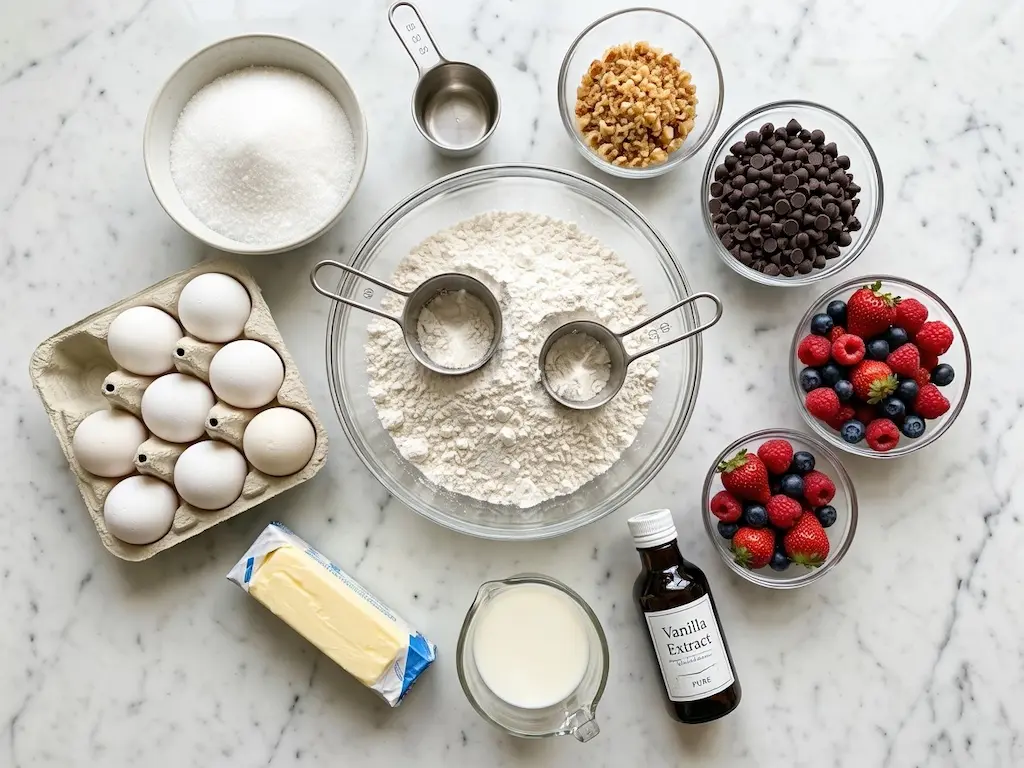
Ingredients for Dot Cake
Dry ingredients:
- 1 and a half cups (190g) all-purpose flour, plus 1 tablespoon for coating the dots
- 1 cup (200g) granulated sugar
- 1 and a half teaspoons baking powder
- a quarter teaspoon fine salt
Wet ingredients:
- half a cup (113g) unsalted butter, softened to room temperature (or half a cup of neutral oil)
- 2 large eggs, at room temperature
- half a cup (120 ml) whole milk, at room temperature
- 1 and a half teaspoons pure vanilla extract
The dots (choose 1 to 2 cups total):
- Classic: 1 cup semi-sweet chocolate chips
- Fruity: 1 cup fresh or frozen berries, not thawed if frozen
- Jam dots: half a cup of your preferred jam or fruit preserves
- Nutty: three quarters of a cup of chopped walnuts or pecans
- Funfetti: half a cup of rainbow sprinkles
For more baking essentials and pantry-staple recipes, see our 21-day clean eating meal plan for ideas on building a cleaner, simpler kitchen habit.
How to Make Dot Cake: Step-by-Step
Prep time: 15 minutes | Cook time: 30 to 35 minutes | Total time: approximately 50 minutes | Servings: 8 to 10 slices | Difficulty: Easy
Step 1: Prep (5 minutes)
Preheat your oven to 350 degrees F (175 degrees C). Grease a 9-inch round or square cake pan with butter or cooking spray, dust with flour, and tap out the excess. Line the bottom with a circle of parchment paper cut to fit: this prevents the bottom from sticking regardless of how long the cake bakes.
Step 2: Coat the Dots (1 minute)
Place your chosen dots in a small bowl. Add 1 tablespoon of all-purpose flour and toss until the dots are lightly but evenly coated. Set aside. Do not skip this step, as it is the foundation of the entire Perfect Dot Method.
Step 3: Mix Dry Ingredients (2 minutes)
In a large mixing bowl, whisk together the flour, granulated sugar, baking powder, and salt until uniformly combined. There should be no streaks of any single ingredient visible.
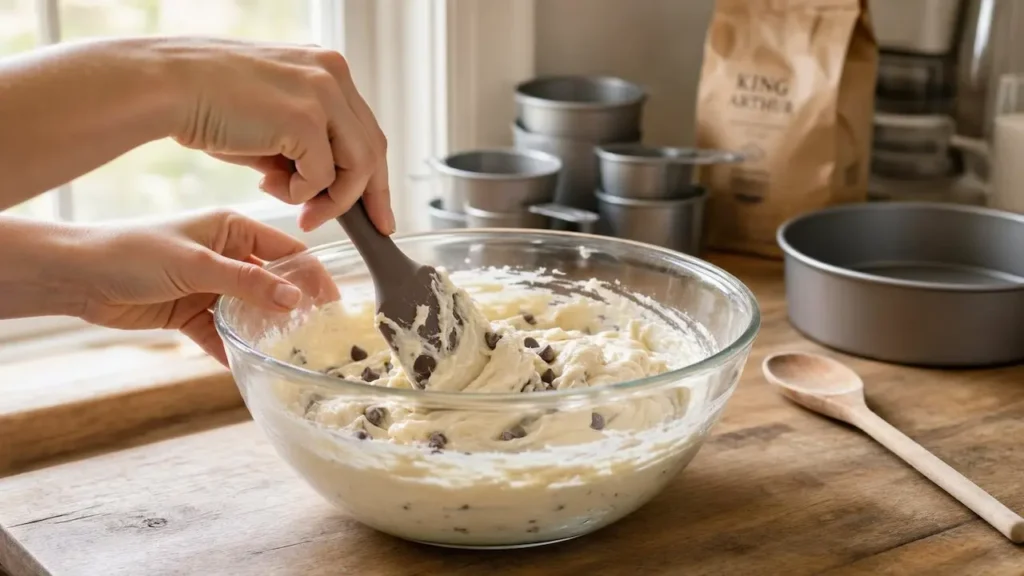
Step 4: Add Wet Ingredients (3 minutes)
Add the softened butter, eggs, milk, and vanilla extract to the dry ingredients. Mix with a hand mixer on medium speed for 2 minutes until the batter is smooth, pale, and slightly increased in volume. If mixing by hand, whisk vigorously for 3 full minutes to develop the same result. The batter should be thick enough to fall from a spoon in a ribbon rather than streaming freely.
Step 5: Fold in the Dots (1 minute)
Switch from the mixer to a rubber spatula. Add the flour-coated dots to the batter. Fold gently from the bottom of the bowl upward, rotating the bowl as you work. Stop as soon as the dots are evenly distributed throughout the batter: approximately 8 to 10 folding motions is usually sufficient.
Step 6: Bake (30 to 35 minutes)
Pour and scrape the batter into the prepared pan, spreading it to the edges with the spatula. Bake at 350 degrees F for 30 to 35 minutes. Begin checking at the 28-minute mark. The cake is done when a toothpick inserted in the center comes out with moist crumbs (not wet batter). If the toothpick hits a chocolate chip or fruit piece, test a different spot. The top of the cake should spring back lightly when pressed with a fingertip.
Step 7: Cool and Serve (30 minutes)
Let the dot cake cool in the pan on a wire rack for 10 minutes. Run a thin knife around the edges, then turn out onto the rack to cool completely before slicing. Cutting into a hot or warm dot cake causes the crumb to tear rather than slice cleanly.
For more desserts that work well for afternoon occasions, see our matcha affogato as a complementary serving option alongside a slice of dot cake.
PrintDot Cake
A soft and tender homemade Dot Cake filled with delicious pockets of chocolate chips or your favorite add-ins.
- Prep Time: 15 minutes
- Cook Time: 35 minutes
- Total Time: 50 minutes
- Yield: 8 servings 1x
- Category: Dessert
- Method: Baking
- Cuisine: American
Ingredients
- 1½ cups (190g) all-purpose flour
- 1 tablespoon all-purpose flour, for coating the dots
- 1 cup (200g) granulated sugar
- 1½ teaspoons baking powder
- ¼ teaspoon fine salt
- ½ cup (113g) unsalted butter, softened
- 2 large eggs
- ½ cup (120ml) whole milk
- 1½ teaspoons pure vanilla extract
- 1 cup semi-sweet chocolate chips
Instructions
- Preheat oven to 350°F (175°C).
- Grease and flour a 9-inch cake pan.
- Toss chocolate chips with 1 tablespoon flour.
- Whisk flour, sugar, baking powder, and salt.
- Add butter, eggs, milk, and vanilla.
- Mix until smooth.
- Fold in the coated chocolate chips gently.
- Pour batter into the pan.
- Bake for 30 to 35 minutes.
- Cool completely before slicing.
Notes
Coating the chocolate chips in flour helps prevent them from sinking. Store leftovers in an airtight container for up to 4 days.
Nutrition
- Serving Size: 1 slice
- Calories: 290
- Sugar: 22g
- Sodium: 130mg
- Fat: 13g
- Saturated Fat: 8g
- Unsaturated Fat: 4g
- Trans Fat: 0g
- Carbohydrates: 40g
- Fiber: 1g
- Protein: 4g
- Cholesterol: 60mg
Dot Cake vs. Other Simple Cakes
| Cake Type | Texture | Dots / Add-ins | Prep Time | Best For |
|---|---|---|---|---|
| Dot Cake | Soft, tender | Chocolate, fruit, jam, nuts, sprinkles | 15 minutes | Everyday dessert, any occasion |
| Pound Cake | Dense, rich, buttery | Minimal, usually plain | 20 minutes | Coffee or tea pairing |
| Bundt Cake | Moist, dense | Usually just a glaze | 25 minutes | Special occasions |
| Sponge Cake | Light, airy | Rarely, structural base only | 20 minutes | Layered celebration cakes |
| Muffins | Tender, domed | Frequent, similar add-ins | 10 minutes | Breakfast, lunchbox snack |
Dot cake is the easiest of these options with the most room for customization. It is softer than pound cake, simpler than Bundt, and more interesting than plain sponge. The muffin comparison is the closest, but dot cake produces a larger, more shareable format with a finer crumb suited to dessert rather than breakfast.
Variations of Dot Cake
Classic Chocolate Dot Cake
Use 1 cup of semi-sweet chocolate chips as the dots. For a double chocolate version, add a quarter cup of unsweetened cocoa powder to the dry ingredients and reduce the flour by the same amount. After the cake has cooled completely, drizzle with melted chocolate thinned with a small amount of neutral oil.
Berry Burst Dot Cake
Use 1 cup of fresh or frozen blueberries or raspberries as the dots. Toss in flour before folding in as directed. Add 1 teaspoon of finely grated lemon zest to the batter along with the vanilla for a bright citrus note that amplifies the berry flavor. Finish with a dusting of powdered sugar rather than frosting.
Jam-Filled Dot Cake
Prepare the plain vanilla batter as directed but omit the dot add-ins at the folding stage. Pour half the batter into the prepared pan. Drop heaped teaspoons of jam or fruit preserves across the surface of the batter, leaving space between each dollop. Pour the remaining batter over the top and use a knife to make 4 or 5 gentle swirling passes through the batter to partially marble the jam without completely mixing it in.
Tropical Dot Cake
Use three quarters of a cup of chopped dried pineapple combined with a quarter cup of unsweetened shredded coconut as the dots. Substitute a quarter cup of the whole milk with full-fat coconut milk. Add half a teaspoon of coconut extract alongside the vanilla. Finish with toasted coconut flakes scattered across the top after baking.
Mini Dot Cakes
Use the same batter and divide it evenly between 12 standard muffin cups lined with paper liners. Reduce the baking time to 20 to 22 minutes and begin checking at 18 minutes. Mini dot cakes are ideal for lunchboxes, portion control, and occasions where individual servings are more practical than a full cake.
For more soft-baked recipes that use pantry staples, see our cottage cheese banana muffins for a high-protein variation on the same format.
Baking Tips for Perfect Dot Cake Every Time
Do not overmix the batter. Overmixing after the flour is added develops gluten strands that make the crumb tough and chewy rather than tender. Mix only until the dry and wet ingredients are combined, stop when no streaks of flour remain, and switch to a spatula as soon as the dots go in.
Measure flour accurately. Scooping the measuring cup directly into the flour bag compacts the flour and can add 20 to 30% more than the recipe intends, resulting in a dry and dense dot cake. Use the spoon-and-level method: spoon flour into the measuring cup until it overflows, then level the top with the flat side of a knife.
Use room-temperature ingredients. Cold butter does not cream properly and leaves lumps in the batter that bake into dense pockets. Cold eggs can cause the batter to curdle slightly, creating an uneven crumb. Remove butter, eggs and milk from the refrigerator 30 minutes before starting the recipe.
Check doneness properly. The toothpick test works for dot cake but requires interpretation. A toothpick that comes out with wet batter means the cake needs more time. A toothpick that comes out clean or with a few moist crumbs means the cake is done. If the toothpick hits a chocolate chip or fruit piece and comes out wet with filling, try a different spot before making a decision.
Cool before slicing. Hot cake has a soft, fragile crumb that tears when cut. The 10-minute rest in the pan followed by complete cooling on a wire rack allows the crumb structure to set. If you cut into warm dot cake, the slices will crumble. If you wait until it is fully cool, the slices will be clean.
Coat sticky add-ins. Chocolate chips, fruit pieces, and nuts should all be tossed in flour before being folded into the batter. This is the most important single technique for dot cake success and the one most frequently skipped. Do not skip it.
Serving Ideas for Dot Cake
The simplest and most satisfying way to serve dot cake is at room temperature, sliced directly from the pan, with no additional preparation required. The texture is at its best within 24 to 48 hours of baking when the crumb is still soft and the dots retain their distinct character.
For pairing, a cup of strong tea or black coffee is the classic companion, and the slight bitterness of both drinks balances the sweetness of the cake effectively. A spoonful of lightly whipped cream adds airiness without competing with the flavors inside the cake. Fresh berries alongside a chocolate chip dot cake provide color contrast and a tartness that cuts through the richness.
For occasions, Dot Cake travels well in an airtight container and holds its shape during transport, making it reliable for potlucks and bake sales. The mini version works in lunchboxes. The jam-filled variation wrapped in parchment and tied with ribbon makes a straightforward homemade gift.
For a complete afternoon spread that pairs well with dot cake, see our chocolate-covered pecans for an easy no-bake addition to the table.
Storage and Freezing
At room temperature: Store the cooled dot cake in an airtight container or covered cake dome. It stays fresh and moist for 3 to 4 days. Keep away from direct sunlight and heat sources.
In the refrigerator: Dot cake can be refrigerated for up to 5 to 7 days, but the crumb may dry out slightly faster than at room temperature. Wrap tightly in plastic wrap or store in an airtight container. Bring to room temperature for 20 to 30 minutes before serving.
In the freezer: Dot cake freezes exceptionally well. Slice the cooled cake, wrap each slice individually in plastic wrap, then place wrapped slices in a sealed freezer bag. Frozen dot cake keeps for up to 3 months. Thaw individual slices at room temperature for approximately 2 hours. Alternatively, microwave a frozen slice for 20 to 25 seconds for a warm, slightly melty-dot experience.
Frequently Asked Questions About Dot Cake
What Is Dot Cake?
Dot cake is a soft, tender homemade cake with small dots of flavor, such as chocolate chips, jam dollops, fruit pieces, or nuts, distributed throughout the crumb. It is valued for its simple preparation, pantry-staple ingredient list, and the customizability of the dots for any occasion or preference.
Can I Make Dot Cake with Oil Instead of Butter?
Yes. Substitute half a cup of neutral oil (vegetable, canola, or melted coconut oil) for the butter. The dot cake will be slightly more moist but with a less rich, less buttery flavor. If using oil, skip the creaming step and simply whisk the wet ingredients together before adding to the dry.
How Do I Keep Dot Cake Soft?
The three most important factors are not overbaking (pull the cake at the first sign of doneness, not after), storing in an airtight container immediately after cooling, and using room-temperature ingredients for proper batter emulsification. Adding a tablespoon of sour cream or plain yogurt to the wet ingredients also helps retain moisture over several days.
Can I Freeze Dot Cake?
Yes. Wrap individual slices in plastic wrap and store in a freezer bag for up to 3 months. The texture holds well through freezing and thawing, and chocolate chip dots become pleasantly melty when the cake is warmed briefly in the microwave after thawing.
Why Do My Dots Sink to the Bottom?
Dots sink when the batter is too thin or the dots are not coated in flour before folding in. Apply the Perfect Dot Method: coat all add-ins in 1 tablespoon of flour, ensure the batter is thick enough to be scoopable rather than pourable, and fold gently rather than stirring.
Can I Use Frozen Fruit in Dot Cake?
Yes, and you should not thaw it first. Frozen fruit that has been thawed releases a significant amount of liquid that turns the batter purple, gray, or pink and creates wet pockets in the crumb. Toss the frozen fruit in flour directly from the freezer and fold it into the batter at the last moment. Add 2 to 3 minutes to the total baking time.
What Pan Size Should I Use?
A 9-inch round or square pan produces the proportions described in this recipe. A 9 by 13 inch pan also works: reduce the baking time to 25 to 30 minutes and begin checking at 23 minutes. Muffin tins (standard 12-cup) work for mini dot cakes: fill each cup approximately two thirds full and bake for 20 to 22 minutes.
The Bottom Line: Simple, Soft and Satisfying
Dot cake is proof that the best desserts do not need to be complicated. With a simple batter, pantry staples, and whatever dots speak to the occasion, the result is a soft, tender cake that makes every slice a small discovery. The Perfect Dot Method solves the one technical challenge that turns people away from this style of baking, and once you have it, the rest of the recipe is almost entirely forgiving.
Whether you are baking for an afternoon with tea, filling lunchboxes for the week, or just looking for something to do with the chocolate chips and jam in the back of the cupboard, Dot Cake is reliable, nostalgic, and exactly as good as you remember it being.
Preheat the oven, coat your dots, and enjoy the straightforward pleasure of something made from scratch.
For more baking inspiration built around simple, classic techniques, see our sourdough cinnamon bread for another timeless recipe worth adding to your regular rotation.
✨ Ready to Bake?
Save this recipe to your Pinterest board and never lose it!
📌 Save on PinterestClassic Dot Cake • Perfect Dot Method • 50 minutes